A sub-base is the layer that does the real work under a drive, patio or shed base. The slabs, blocks or concrete on top get the attention, but if the layer beneath them moves, everything above it moves too: cracked paving, rocking slabs, a slab base that sinks at one corner. MOT Type 1 is the standard UK material for that job, a crushed stone graded from roughly 40mm down to dust so that, once compacted, the fines lock the larger pieces together into a solid, free-draining bed.
This guide walks through laying it properly: digging to the right depth, deciding whether you need a membrane, spreading and compacting in layers, and blinding the surface ready for whatever goes on top. The figures here follow normal UK practice, but ground conditions vary, so treat soft or waterlogged ground as a reason to dig deeper and add a membrane rather than press on.
To work out how many tonnes you need before you order, run your area and depth through our MOT Type 1 calculator.
What you need
- MOT Type 1 aggregate (work out the tonnage with the calculator)
- A vibrating plate compactor, also called a wacker plate, from a tool hire shop
- Geotextile separation membrane if the ground is soft (more on this below)
- Spade, mattock or a mini digger for larger areas, a wheelbarrow, a rake and a stiff broom
- A long spirit level or a string line and pegs to set falls and check levels
- Sharp sand or grit for blinding if you are paving on top
Recommended depths
Depth is measured as the compacted thickness of Type 1, so allow extra loose material before it is rolled down. As a rough rule, loose aggregate loses around a tenth to a quarter of its depth once it is fully compacted, so allow for that settlement, which is also why you spread and compact in layers rather than in one go.
Typical UK depths:
- Footpaths and light foot traffic: 75mm of compacted Type 1
- Patios: 100mm of compacted Type 1
- Shed and garden building bases: 100mm is usually enough for a domestic timber shed; go to 150mm for heavier buildings or soft ground
- Domestic driveways (cars): 150mm of compacted Type 1
- Soft, clay or wet ground: increase the depth and add a geotextile membrane underneath
These match the ranges quoted by hire firms and aggregate suppliers, who put driveways at 100 to 150mm and patios and paths at 75 to 100mm (Speedy Hire). When in doubt, deeper is safer, especially on ground that holds water.
Step by step
1. Mark out and excavate
Set out the area and dig down to the level you need. Your excavation depth is the finished surface level, minus the thickness of whatever sits on top (paving plus bedding, or the concrete slab), minus the compacted sub-base depth.
For example, a patio with 50mm slabs on a 30mm mortar bed over 100mm of Type 1 needs about 180mm of dig below the finished paving level, plus a little extra you will lose to compaction. Get the falls in at this stage: a patio or drive wants a slight slope away from the house, normally around 1:60 to 1:80, so surface water runs off rather than ponding.
Dig out soft spots, tree roots and any loose topsoil. The bottom of the excavation, the formation, should be firm. If it springs underfoot or holds water, that is your signal to dig deeper and lay a membrane.
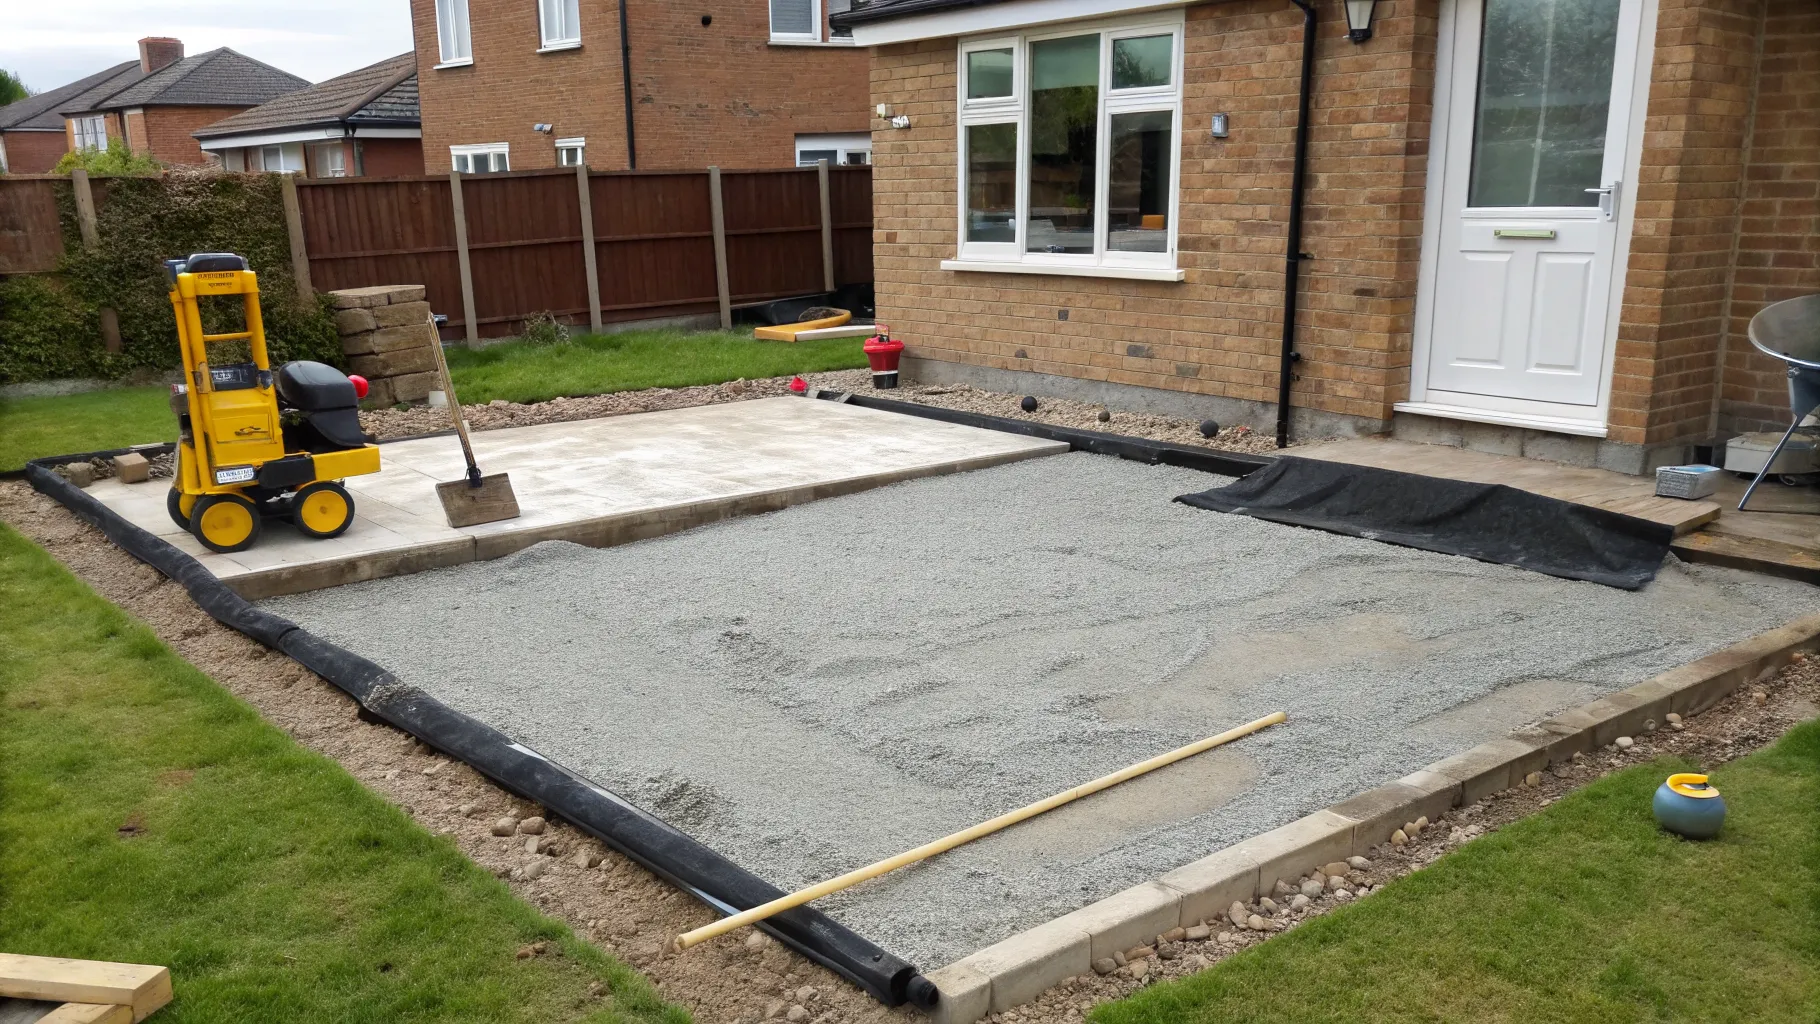
2. Lay a geotextile membrane if needed
A geotextile separation membrane is not always essential, but it earns its place on soft ground. Its main job here is separation: it stops the Type 1 from being pushed down into soft subsoil and stops mud working up into the stone, which is what causes a sub-base to sink and lose strength over time. If the subsoil is clay, silt or anything soft enough to leave a footprint, lay the membrane across the whole excavation and overlap any joins by at least 300mm (Pavingexpert).
Run the membrane a little up the sides of the excavation so the stone is fully contained. On firm, well-drained ground it is optional, though many people add one anyway for a small cost and the bonus of suppressing weeds.
3. Spread the first layer
Tip and rake the Type 1 out in an even layer. The key rule is to work in layers of around 50mm, never more than about 75mm at a time, because a wacker plate cannot compact a thick layer all the way through (Speedy Hire). A 100mm patio base is two layers; a 150mm drive is two or three.
Rake out any obvious clumps of fines and keep the surface roughly to your falls as you go.
4. Compact each layer with the wacker plate
Run the plate compactor over each layer before adding the next. Make several passes in different directions until the surface stops settling and no longer moves underfoot. A light spray of water on a dry, dusty layer helps the fines bind and compact better, so dampen it if the material is bone dry, but do not soak it.
Hire a wacker plate from most tool hire shops for roughly £30 to £50 a day, depending on the supplier and region. A heavier plate compacts deeper, so for a driveway ask for a larger machine rather than the smallest one.
Check levels and falls as you compact. Top up any low spots with a little more material and compact again rather than leaving a dip to deal with later.
5. Build up to the full depth
Repeat spread and compact until you reach the compacted depth for your job: 100mm for a patio, 150mm for a drive. Because you lose depth to compaction, keep checking against your pegs or string line so you finish flush with the level you marked out, not above or below it.
A properly compacted sub-base feels solid. Walk across it, and it should not visibly move or leave deep footprints.
6. Blind the surface
Blinding means closing off the surface with a thin layer of fines or sharp sand so there are no open voids in the top of the Type 1. It gives a smoother, tighter face for the bedding layer to sit on and stops mortar or bedding sand disappearing into gaps in the stone. A thin scatter of sharp sand or grit, around 10mm, brushed and compacted in, does the job (Easy Merchant).
Once blinded and compacted, the sub-base is ready for paving on a mortar or bedding bed, for block paving on a sand screed, or for a concrete slab to be poured on top.
Costs
MOT Type 1 is cheap by the tonne, but prices move with region and supplier, so treat these as a guide and get a local quote. As a rough current range, loose tipped Type 1 runs around £25 to £55 a tonne plus delivery, while a bulk bag of roughly 850kg tends to cost more per tonne, often £50 to £70 a bag (Travis Perkins). For anything over a couple of tonnes, a loose tipper load from a local quarry or aggregate yard is usually far cheaper per tonne than bulk bags, so it pays to ring round.
To avoid ordering short or paying to cart away a surplus, put your measurements into the MOT Type 1 calculator first. It turns your area and compacted depth into tonnes, with a wastage allowance built in.
FAQ
How deep should an MOT Type 1 sub-base be?
About 75mm compacted for paths, 100mm for patios and shed bases, and 150mm for a domestic driveway taking cars. Increase the depth on soft, clay or waterlogged ground, and add a geotextile membrane underneath.
Do I always need a membrane under Type 1?
No. On firm, well-drained ground it is optional. On soft, clay or wet subsoil it is strongly recommended, because it separates the stone from the soil and stops the sub-base sinking. Overlap any joins by at least 300mm.
Can I lay the whole depth in one go and compact once?
No. A wacker plate only compacts the top 50 to 75mm properly, so a single thick layer stays loose underneath and will settle later. Spread and compact in layers of around 50mm.
How many passes with the wacker plate?
There is no fixed number. Run it back and forth in different directions until the surface stops settling and does not move underfoot. Dampening a dry layer helps it compact.
What is blinding and do I need it?
Blinding is a thin layer of fines or sharp sand, around 10mm, brushed and compacted into the top of the sub-base to close off voids. It gives a tidy surface for paving or bedding to sit on. It is worth doing before you lay slabs or blocks.
How much Type 1 do I need?
That depends on your area and depth. As a guide, 1 tonne of compacted Type 1 covers roughly 10 square metres at 50mm, but the exact figure varies with the material. Work out exact quantities with our MOT Type 1 calculator.
Get the quantity right first
A sub-base is only as good as the prep underneath it: dig to a firm formation, add a membrane on soft ground, and build up in compacted 50mm layers to the right depth for the job. Before you order the stone, run the numbers through our MOT Type 1 calculator so you buy the right tonnage first time.